Getting Started with Microwave Synthesis
There is a completely new side of organic synthesis that is waiting to be discovered.
Are you ready to get started with microwave synthesis? If so, you’re in the right place! This is probably the most important chapter in this book, for it provides the user with a quick review of previous chapters and an explanation of how to actually get started with microwave organic chemistry and perform reactions. As you gain more experience developing and performing reactions, you will be able to design, refine, and optimize your own methods. For a pictorial view, I have developed a flow chart that can be used to help follow this discussion (Chart 1). It has been divided into two parts (Charts 2 and 3). Chart 1 offers an overview of method development for closed and open vessel reactions. Chart 2 takes you through the development of a pressurized microwave reaction, while Chart 3 discusses one performed at atmospheric pressure. I will be referring to these charts throughout the chapter.
This chapter has been organized into two major sections. The first section pertains to method development. It is divided into three main parts, each discussing an important aspect of a typical, microwave-enhanced chemical reaction including atmospheric versus closed conditions; choosing a solvent; and deciding time, temperature, and power parameters. The last section discusses the optimization of your microwave reaction method. What happens if your first method did not work and no product has formed? I will provide details on which parameters you should change and how you should change them. Read on and let’s get started!
Method Development
Pressurized (Sealed Vial) vs. Atmospheric (Open) Reactions
Once you have decided what type of chemical reaction you wish to perform, your first question is going to be whether you should run it in a closed environment or at atmospheric pressure. There are advantages to both. The scale of the reaction will probably be the deciding factor. Pressurized reactions are, of course, smaller in scale, as the certified pressure tubes can only hold about 7 mL. The maximum size is 10 mL, but there needs to be enough headspace to contain the vapors that result. As previously mentioned, a pressurized environment can be very advantageous to many different kinds of chemistries. Solvents can be heated up to temperatures that are two to four times their respective boiling points. Dichloromethane (bp 40 °C) can even be heated to 180 °C, which is 4.5 times its boiling point. This characteristic of microwave synthesis provides the large rate enhancements (up to 1000x) that are observed. Pressurized reactions also provide inert atmospheres for use of air- and moisture-sensitve reagents.
Pressurized reactions provide inert atmospheres for use of air- and moisture-sensitive reagents.
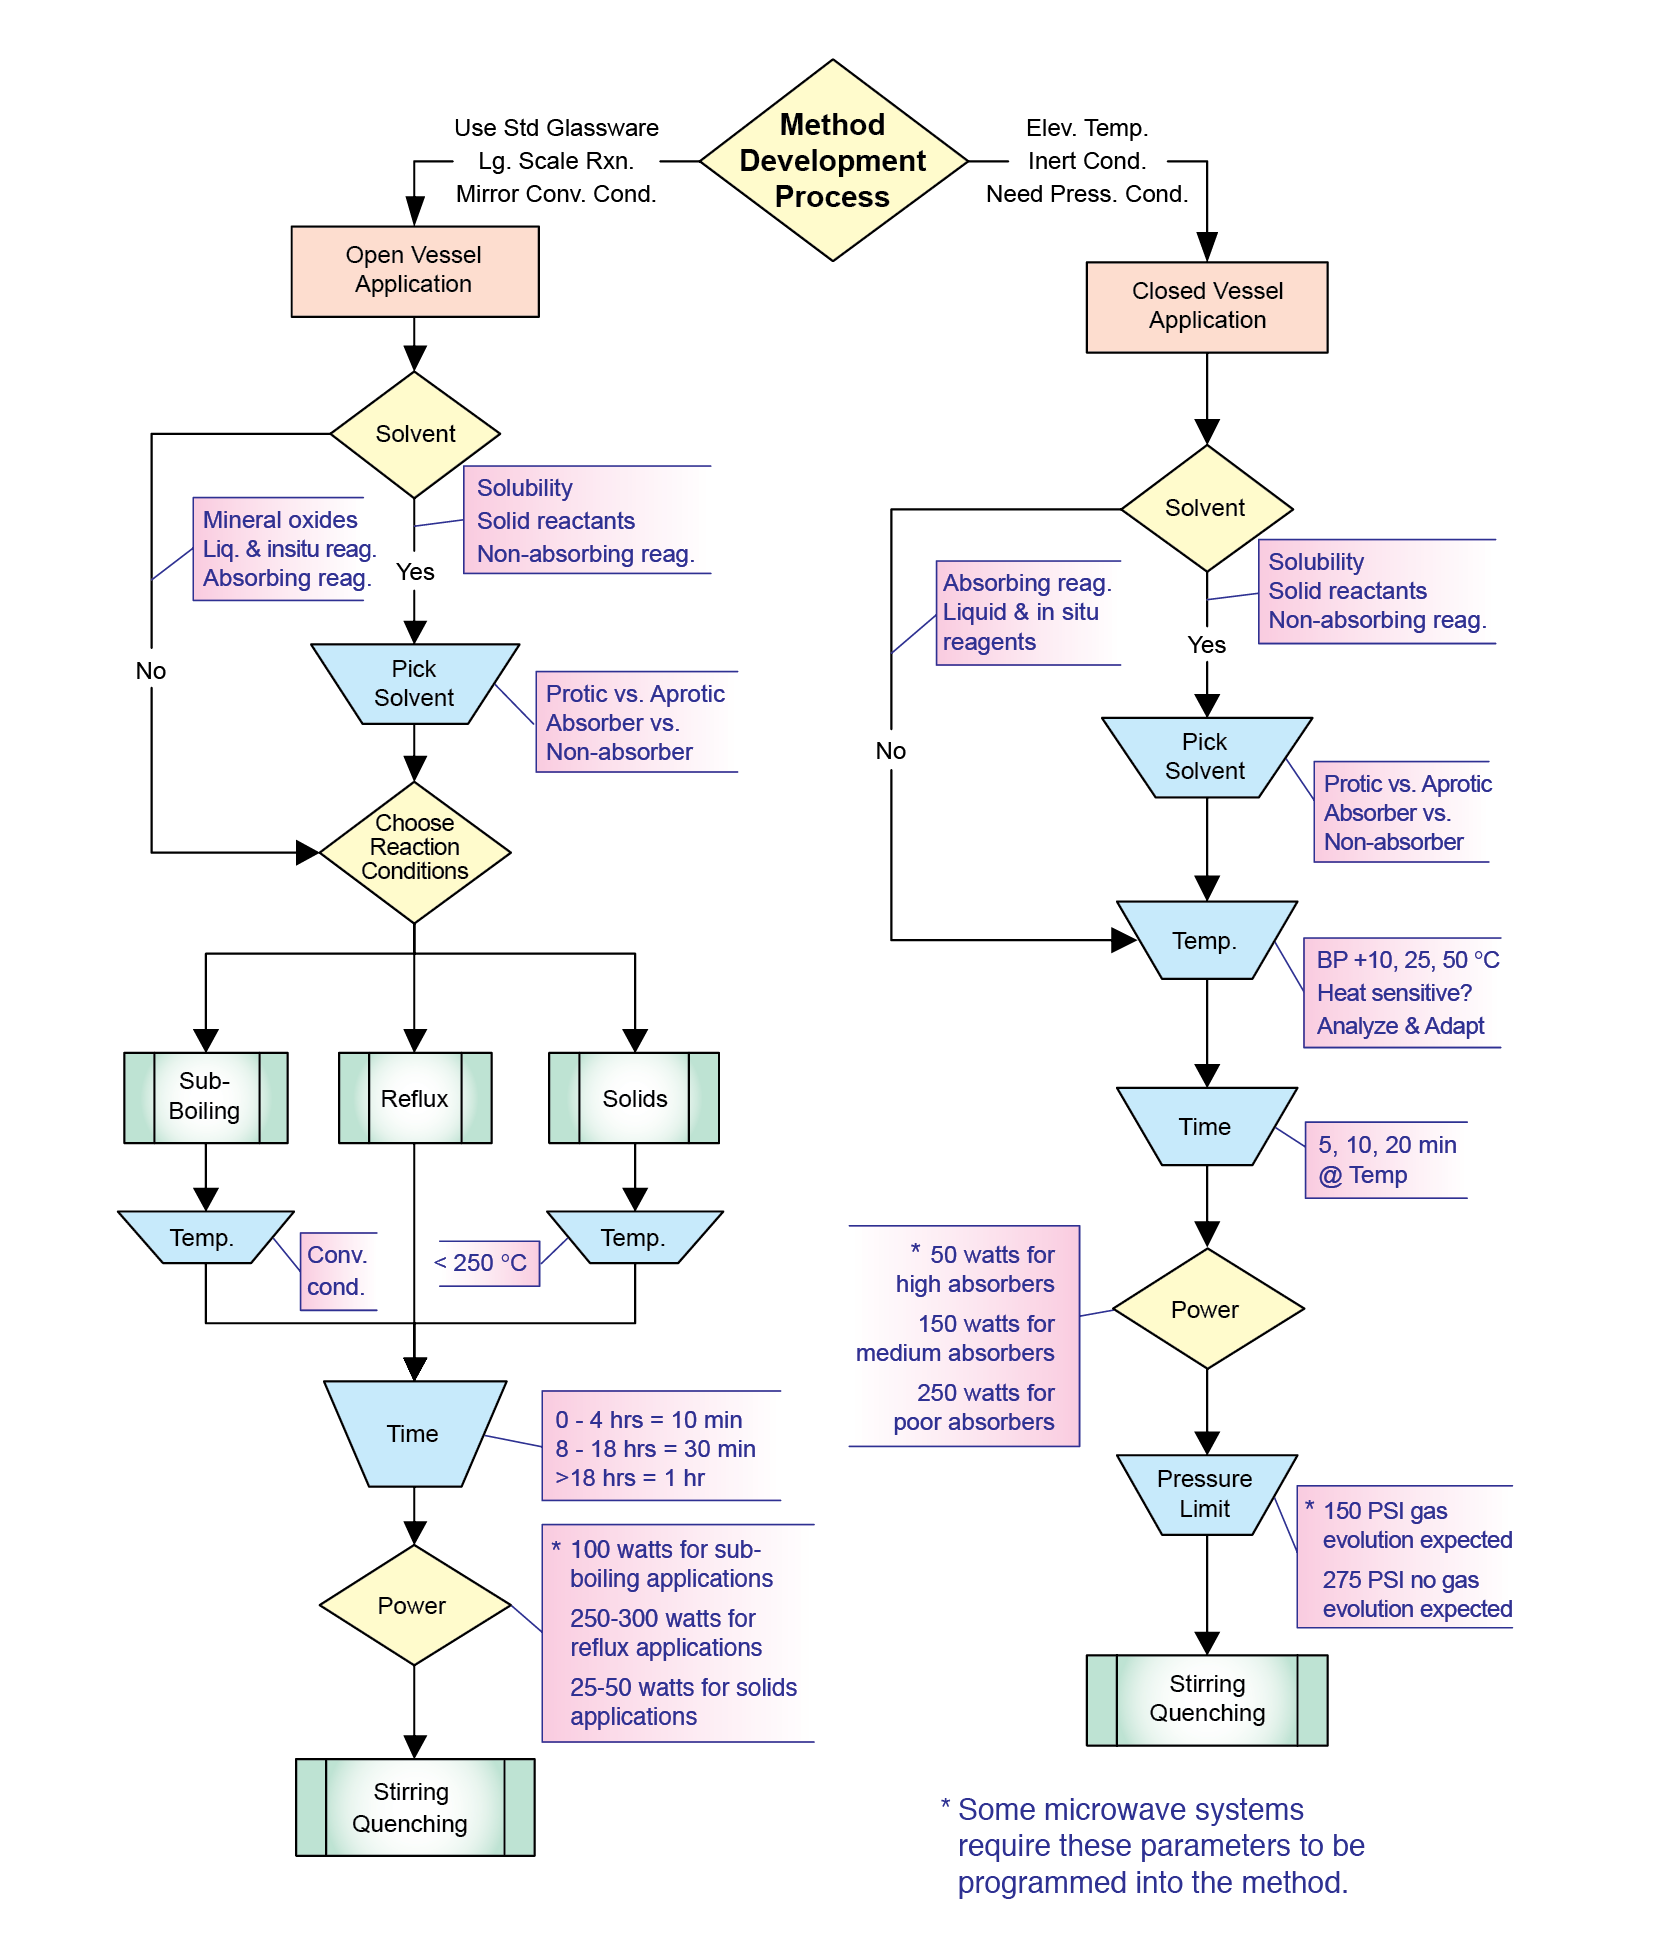
Chart 1
Atmospheric reactions can be performed on a much larger scale than pressurized ones. One major advantage is that they can be done in standard round bottom flasks. This allows for use of reflux condensers, addition funnels, Dean-Stark traps, or any other glass apparatus that is needed. Another major advantage of open vessel microwave organic reactions is that you can mirror the conventional conditions. Under atmospheric conditions, you may not observe the enhancements seen with pressurized vessels, but you will see reaction rates that are 10x faster than conventional methods. Depending on the type of reaction you are doing and the temperatures that are needed, atmospheric conditions may be the method of choice.
Choosing a Solvent
As we move on in Chart 1, the next box we come to asks us whether we are going to use a solvent. Chapter 3 thoroughly discusses both reactions run in the presence of solvent and those run in a solventless environment. It is, once again, your preference, and there are benefits to each. Both open and closed vessel reactions can be performed either way. Most chemists are more familiar with solution phase reactions, but those performed in a solventless environment are becoming more prevalent in organic chemistry. An increasing need for less hazardous reaction conditions and environmentally safe procedures, or green chemistry, has led chemical synthesis in this direction.
There are other reasons to perform solvent-free microwave reactions. If all your reagents are in the liquid form (including in situ reagents) or your solid reagents melt at a certain temperature, then no additional liquid/solvent may be needed. In addition, your reaction mixture could be very “absorbing” without solvent. Polar or ionic reagents will couple very efficiently with the microwave energy. Most of the solvent-free research in which reagents are adsorbed onto mineral oxides has been performed in an open vessel. These reactions usually require larger vessels and mechanical stirring. Depending on what type of reaction you are attempting, a solvent-free method may be optimal.
For solution phase reactions, choice of solvent can be a crucial factor in the outcome. The polarity of a solvent plays a significant role in microwave-assisted reactions. If your reactants are “non-absorbing”, then a polar solvent is necessary. The more polar a reaction mixture is, the greater its ability to couple with the microwave energy, leading to a more rapid rise in internal temperature. Table 28 (taken from Chapter 2) lists some common organic solvents that have been categorized as high, medium, or low absorbers of microwave energy. Though nonpolar solvents (i.e. hexane, benzene, toluene) do not couple very efficiently to microwave energy, and hence, do not heat reactions very well, they can act as a heat sink. Reaction mixtures that are temperature sensitive will benefit greatly from this ability, as the nonpolar solvent will help to draw away the thermal heat that is being produced from the interaction between microwave irradiation and the polar reagents. The reaction is still receiving activation energy, but its internal temperature will remain low.
Additionally, a pressurized environment can be very advantageous, as microwave energy (300 W) will reach and bypass the boiling point of most solvents in a matter of seconds. Certified pressure vessels allow for greater use of the lower boiling point solvents that are normally ignored in conventional high-temperature reactions. For specific information on individual solvents, Chapter 2 provides tables and figures of pressures generated at specific temperatures for different volumes of 25 common solvents.
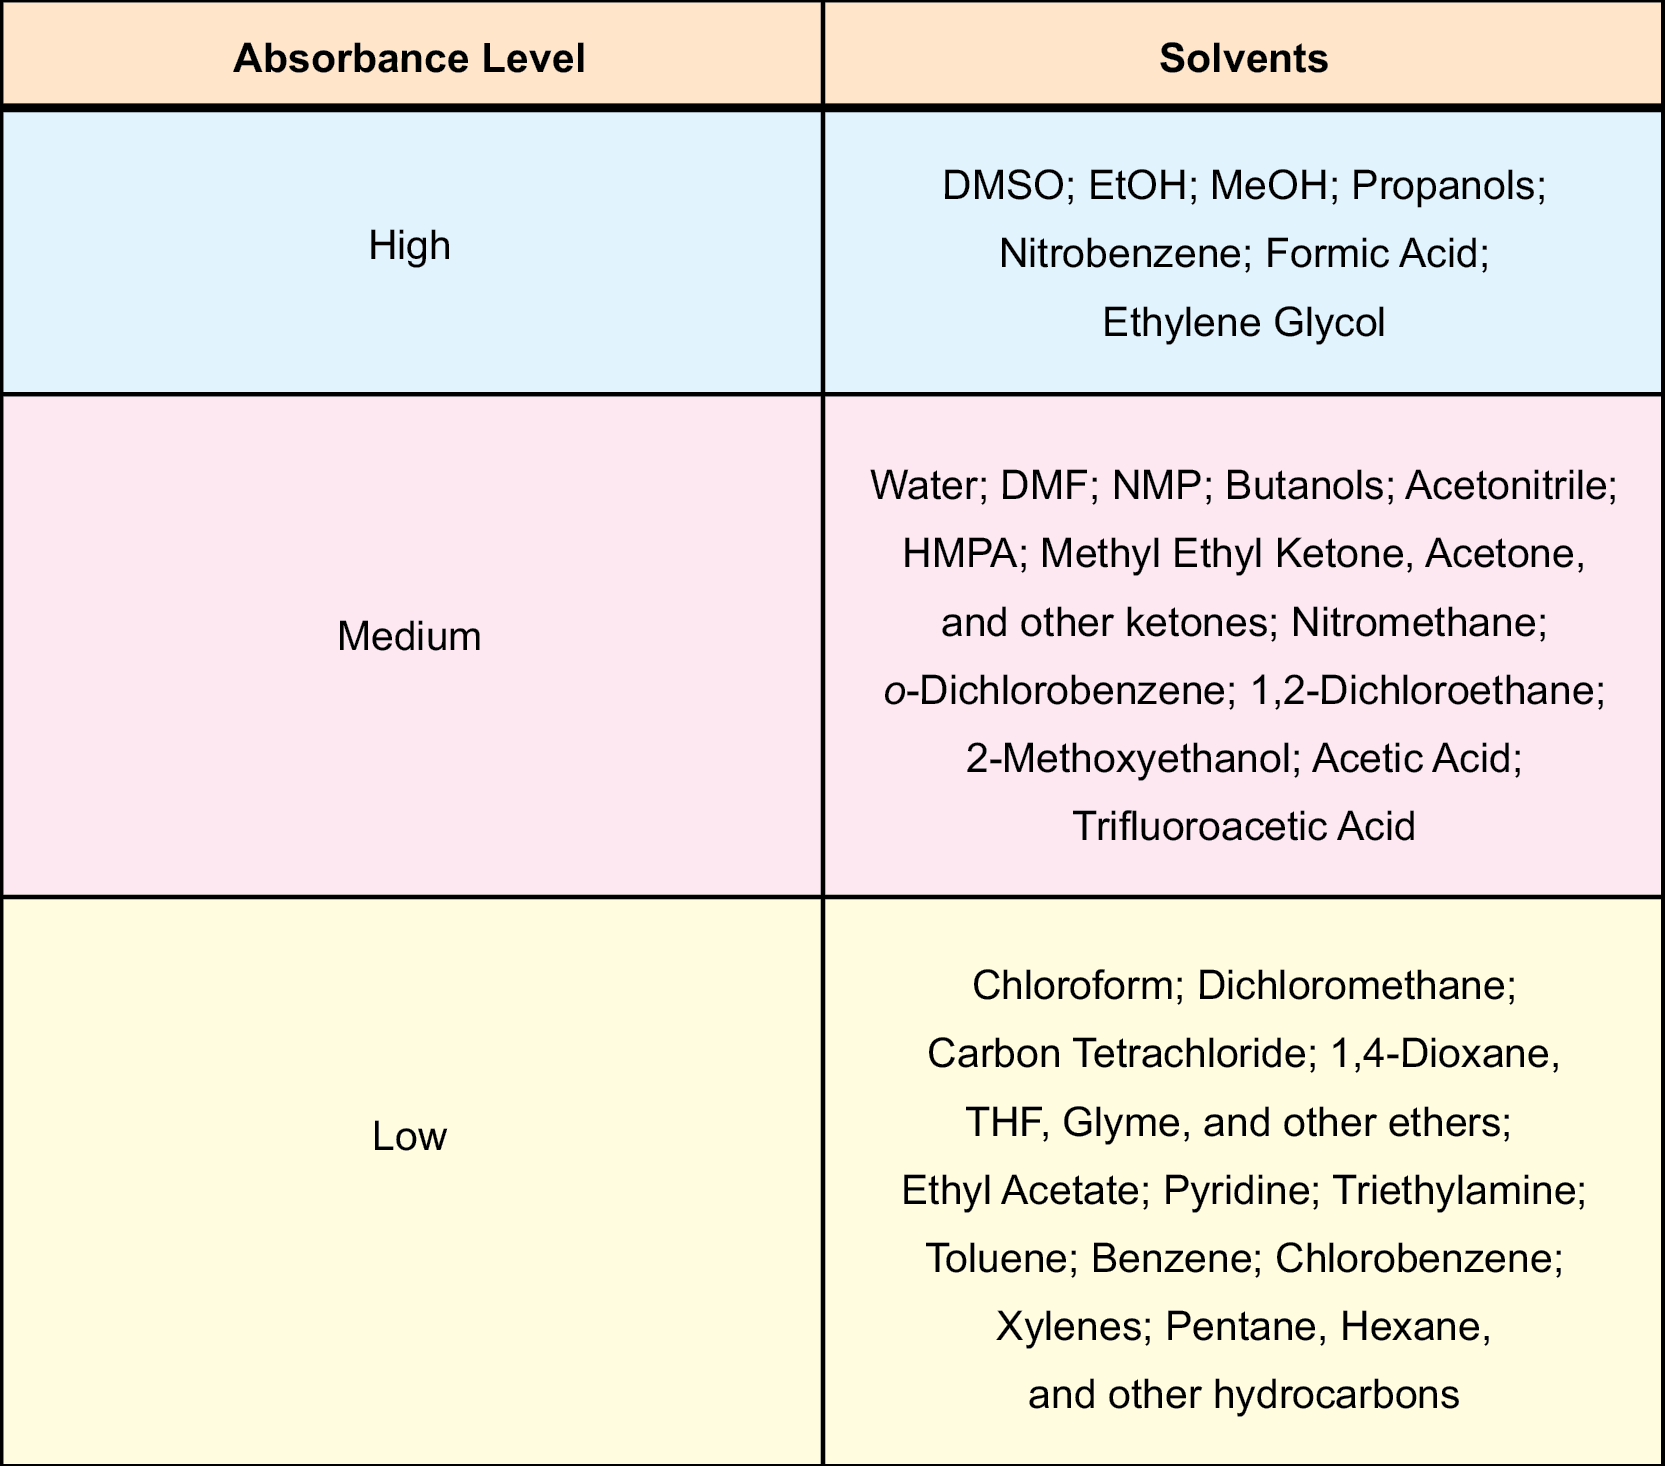
Table 28
General synthetic organic chemistry rules still apply with microwave-assisted chemical reactions. Regardless of the kind of reaction performed, the type of solvent for each remains the same. There are protic and aprotic solvents, and each of these may or may not be applicable for certain kinds of chemistry. Protic solvents have the ability to solvate or interact with both cations and anions, whereas aprotics can only solvate cations. The solvents of each type are interspersed throughout Table 28.
Setting Temperature, Time, and Power in Microwave Synthesis
Once the solvent has been chosen or you have decided to go solvent-free, it is time to design the reaction method. There are three important variables to think about: temperature, irradiation time, and power. These parameters are presented in sequential boxes on the flow chart for each reaction type. They will vary with solvent selection and the choice of open or closed vessel conditions. We are all very familiar with temperature and time, as these dictate how we run conventional reactions. Power, however, is a new variable to consider in microwave-enhanced reactions. It is also probably the most important, but I will discuss this last.
As a traditional organic chemist, you are most concerned about the temperature of your reaction. In microwave reactions performed in pressure vessels (both with and without solvent), the best place to start is ten degrees above the temperature used in the conventional method. If you have chosen to do atmospheric work, follow the left side of Chart 1 according to whether or not you are using solvent. For solvent-free reactions (use of mineral oxides), you could start around 200 °C, but I would not go above 250 °C, as these reaction mixtures will heat quickly. For reactions in solvent, you will have to decide whether you are going to reflux or work with sub-boiling conditions. Set the temperature at least 50 degrees above the boiling point for reflux conditions. Solvents will reach temperatures that are 10-20 degrees above their boiling points in atmospheric microwave-assisted reactions. Setting a high temperature will also ensure a high, constant power level for direct molecular heating. In addition, remember to allow enough head space in your round-bottom flask for rapidly boiling reaction mixtures. It is also wise to use reflux condensers that are at least one foot in length, as solvents at temperatures above their boiling points will rapidly climb the height of the condenser. For sub-boiling temperatures, mimic the conventional method. Begin with the same temperature that you would normally use on the hotplate.
Solvents will reach temperatures that are 10-20 degrees above their boiling points in atmospheric microwave-assisted reactions.
Deciding on how long to run a microwave reaction also depends on the type of reaction being performed. A good starting point for pressurized reactions (both with or without solvent) is 5-10 minutes. I would also use a 5-10 minute reaction time for reactions performed on mineral oxides. For solution phase atmospheric work, use the following reference chart to begin:
|
Conventional |
Microwave |
|
4 hrs |
10 min |
|
8-18 hrs |
30 min |
|
> 18 hrs |
1 hr |
The amount of power being applied to a microwave reaction is very important. Obviously, a low power level might not provide successful results, yet excessive power may cause decomposition. We already know that 300 W of microwave energy will reach and bypass the boiling point of most solvents in a matter of seconds, but do we always need this maximum power value with every reaction? The answer is no. Remember, organic reactions contain many different reagents and catalysts. Their presence can drastically enhance the coupling efficiency of a reaction mixture, regardless of solvent. In addition, many reagents and products are very sensitive to high temperatures and decompose readily. Applying a lower power for a selected amount of time at a certain temperature can sometimes be more effective.
Some microwave systems require the user to program the power parameter. For those that do, this paragraph is important for method development. In a closed reaction, a vessel failure can occur if the pressure rises too quickly because of abundant microwave energy. How do you know the right power level? With any new reaction, especially if you are unsure about how it will react in a microwave, you should start with 50 W. You will know instantly (ca. 5-10 sec) whether it is enough. If your reaction is struggling to reach its designated temperature, then you will have to increase the power. For open vessel, solvent-free reactions, I would start in the 25-50 W range. For refluxing under atmospheric conditions, this is one example where 250-300 W is necessary. A high power level will ensure that there is always constant microwave power being applied, and will keep your reaction mixture at its maximum attainable temperature. Finally, when mimicking conventional methods and working with sub-boiling temperatures, start with 100 W.
High energy is the reason microwaves are so beneficial to organic synthesis and why they have produced such dramatically favorable results. The energy transfer in a microwave-assisted reaction is incredibly quick, as energy is transferred every nanosecond it is applied. Conventional heating methods cannot do that. In a microwave reaction, as the temperature reaches the set value, the power is reduced so that the reaction mixture does not bypass that temperature point. It then stays at a lower level in order to maintain the set temperature throughout the entire reaction. The power, or energy, is the most important variable in a microwave-enhanced reaction. Recent experimentation has shown that simultaneous cooling of the reaction vessel during a reaction will ensure a constant, high power level for direct molecular heating. This has dramatically affected reaction rates and nearly doubled percent yields of some lower yielding reactions.18 Simultaneous cooling can also be especially useful in reactions where the reagents and/or products are heat sensitive. If compressed air is introduced to the cavity while simultaneously applying microwave irradiation, the thermal heat will not accumulate in the reaction mixture. Large amounts of energy can still be applied, while the bulk temperature remains low. This cooling feature can be applied to both closed and open vessel reactions. If your microwave system has this controlled cooling feature, I would highly suggest implementing it in every method.
Simultaneous cooling of the reaction vessel during a reaction can dramatically improve the product yield of some reactions.
Reaction Optimization
If the first method you programmed worked for you and you are happy with the results, then great! However, what happens if your first method did not work and no product has formed? Or, what if your product yield is very low? This is where optimization comes in. First, we’ll discuss ways in which you can optimize your method. Then, as an example, I will optimize both the closed-vessel Negishi reaction (Scheme 141) that is shown on Chart 2 and the open-vessel nucleophilic aromatic substitution (SNAr) reaction (Scheme 142) shown on Chart 3.
The first place that I would start when optimizing a closed-vessel method would be with the temperature parameter. As I previously mentioned, start ten degrees above the temperature used in the conventional method. Sequentially, increase the temperature to 25, 50, and 100 °C above the temperature in the conventional method. As long as you stay below the decomposition temperatures of heat-sensitive reagents, this should help you optimize your method. After finding the optimum temperature, you can then vary your reaction time to maximize product yield. Alternatively, if your reaction is struggling to reach its designated temperature, then you will have to increase the power in small increments. If your microwave system has a controlled cooling feature for simultaneous cooling, use it during the run time of the reaction after the desired temperature is reached and “hot key” the power to a higher level.18b When optimizing reaction conditions and programming methods, remember to change only one variable at a time, so when something is successful, you will know which parameter it was.
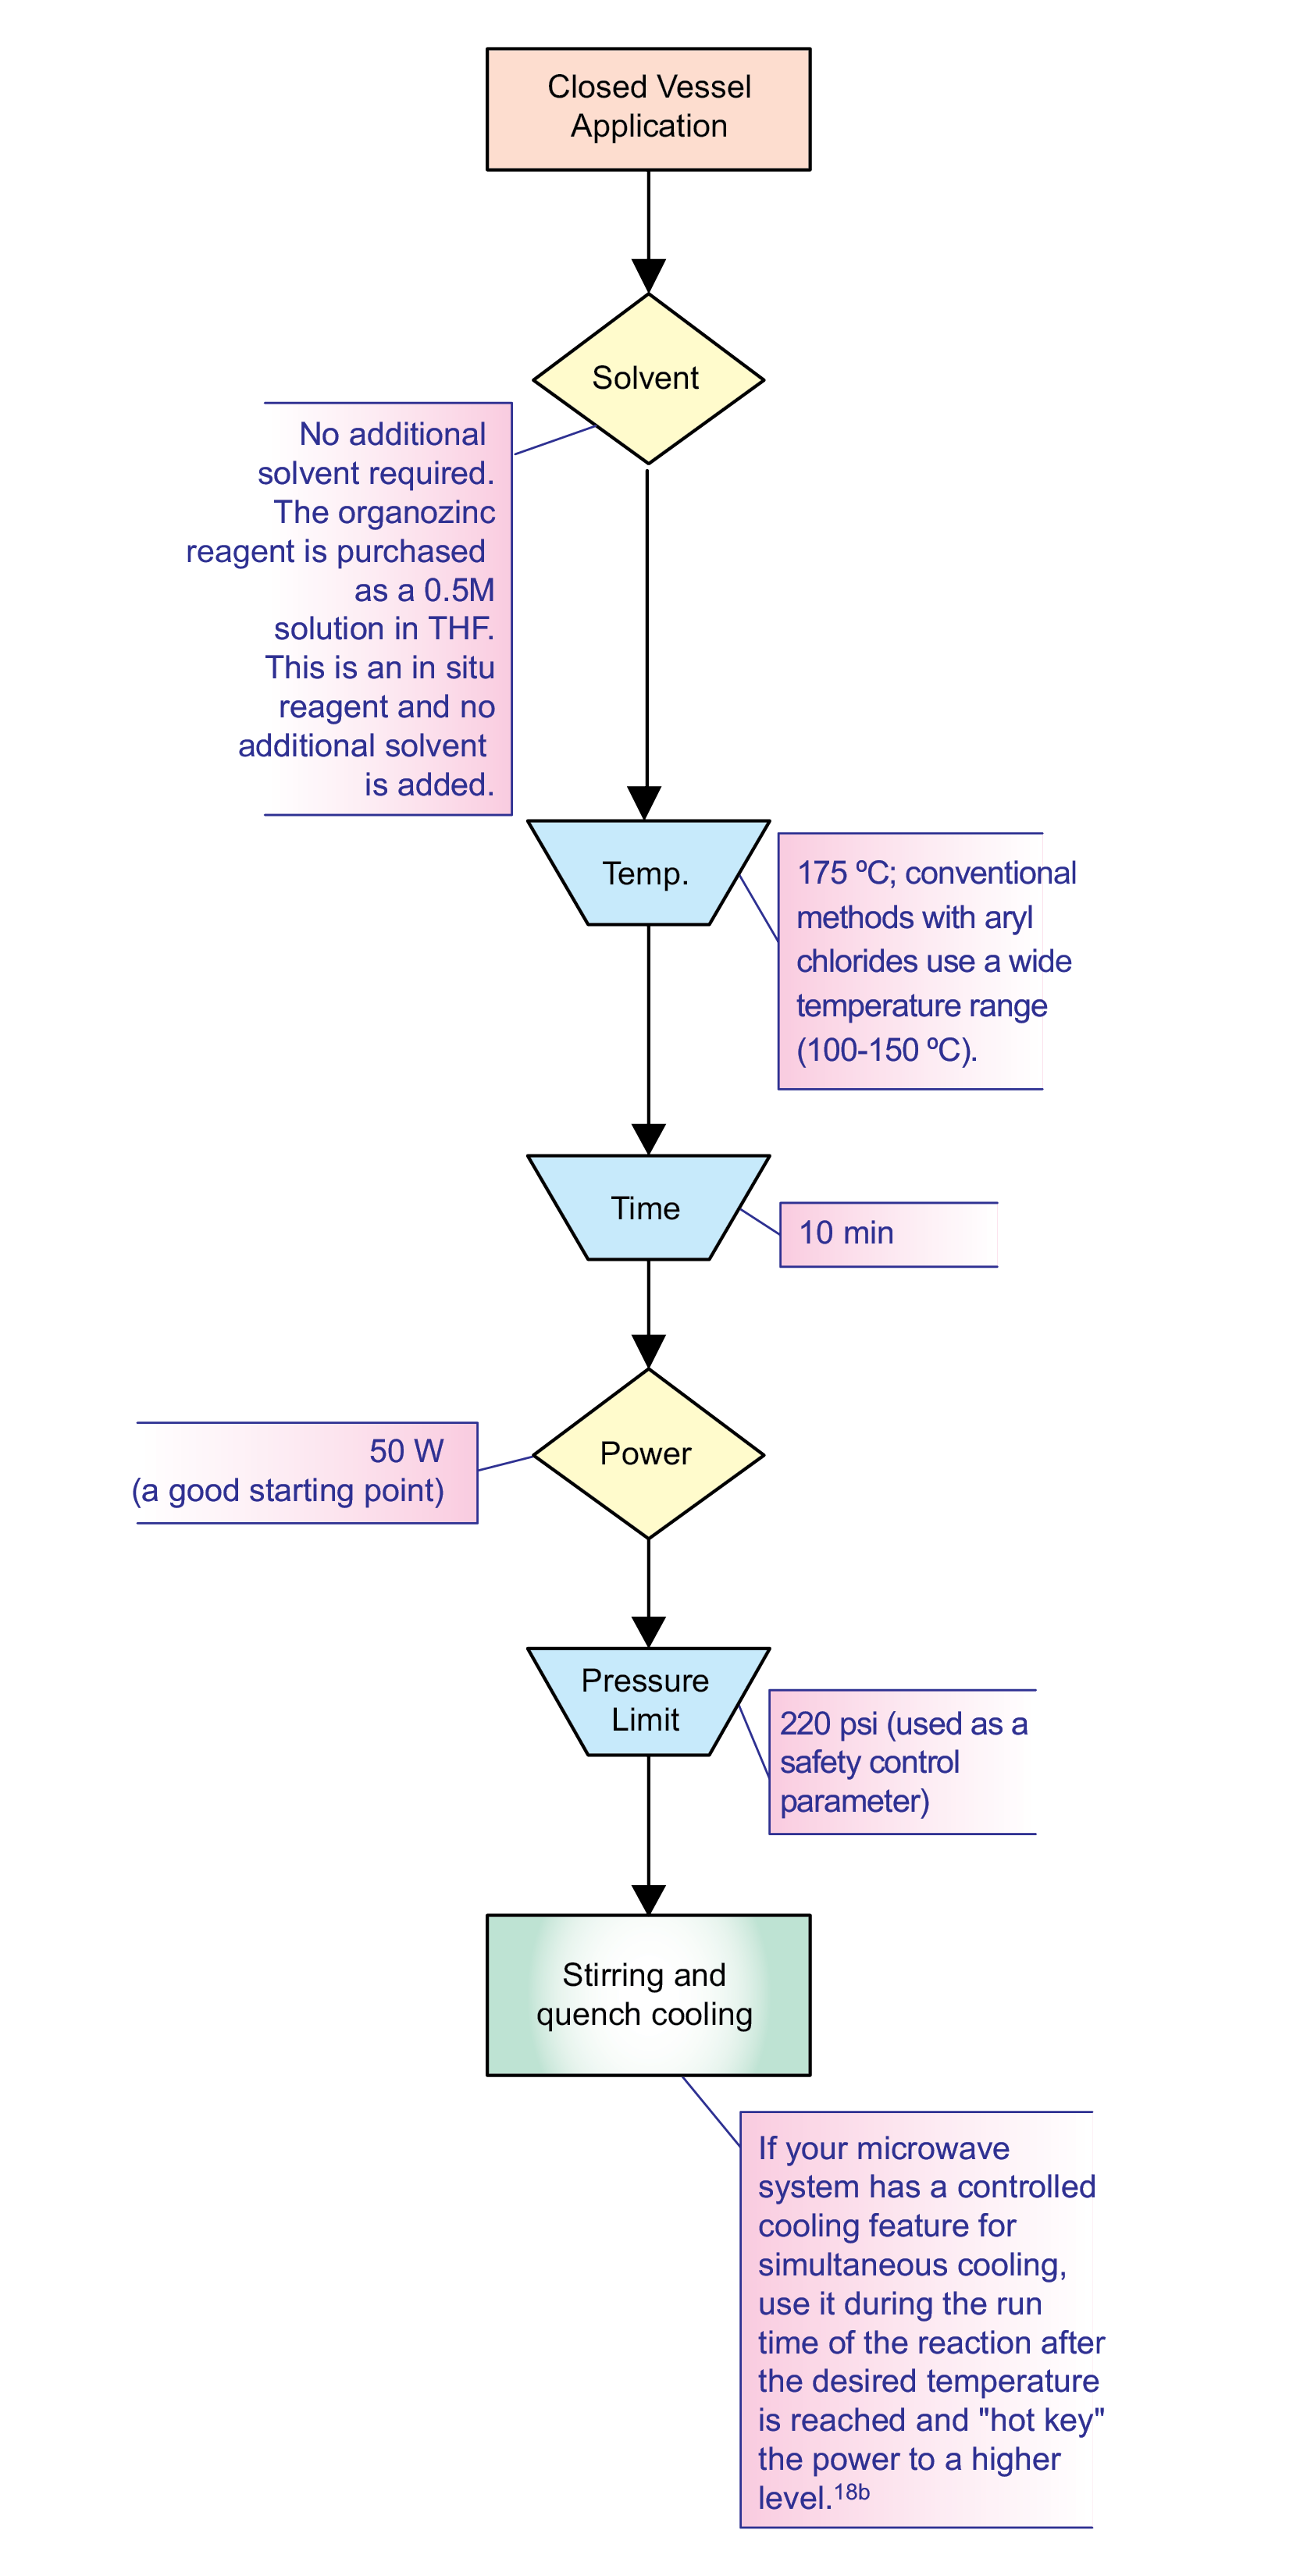
Chart 2
When first attempting a closed-vessel, microwave-assisted Negishi reaction (Scheme 141, Chart 2), I examined the procedure of the conventional method. This method uses a wide range of thermal temperatures (100-150 °C), so I used 160 °C (ten degrees above the conventional method) as my starting point (Power: 50 W; Reaction time: 10 min). Upon analysis, no product was detected. I performed three additional runs at 175, 210, and 240 °C. Product was present in all three, but the percent yield decreased as temperature increased. As the temperature was increased, the predominant species was a 4,4’-dimethoxybiphenyl byproduct. From the results of this experiment, I realized that I should keep the temperature of my reactions around 175 °C.
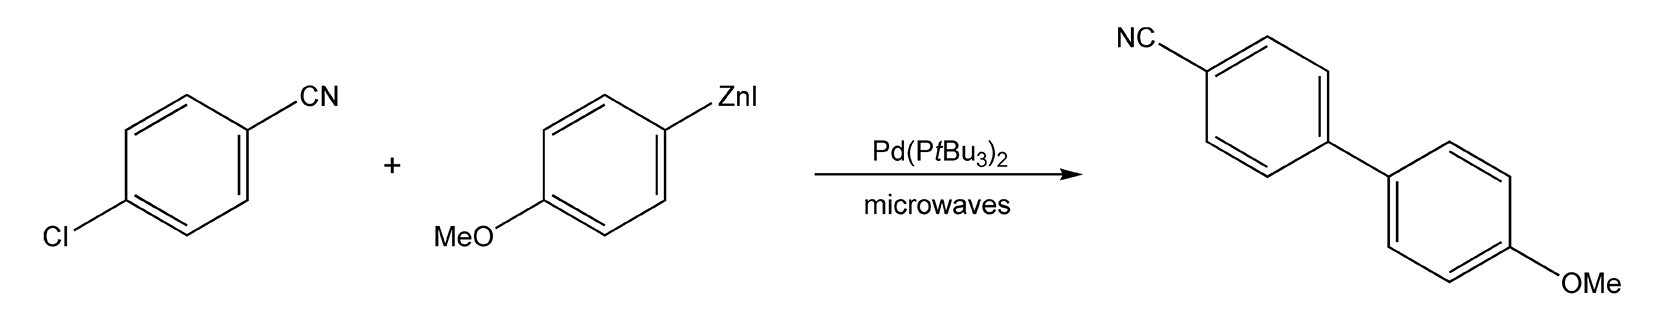
Scheme 141
Once I figured out what temperature to run my Negishi reactions at, I then decided to experiment with reaction times. I ran a series of reactions at 175 °C (Power: 50 W) for 1, 5, 10, and 20 minutes. Upon analysis, I noticed considerable yield increases from one to five minutes and then from five to ten minutes. When I ran the reaction for 20 minutes, I did not notice any significant increase in product yield. In fact, the yield of the biphenyl byproduct increased with this extended reaction time. Thus, the results indicated that holding the reaction for ten minutes at 175 °C was optimal.
All my reactions up to this point were run with an initial power input of 50 W. The reaction mixture was very polar and the temperature point was reached quickly. Once the temperature was reached, the power level decreased. After I determined the optimal reaction temperature and run time, I wanted to ensure a high, constant power level. This can help struggling reactants acquire enough energy for transformation into products. The microwave system used with these reactions had the controlled cooling feature for simultaneous cooling. Once the desired temperature of 175 °C was reached, I administered the cooling feature and “hot keyed” the power up to 80 W in five-watt increments.18b In some Negishi reactions that were lower yielding, cooling helped immensely.
Reaction time is usually the main consideration when optimizing open-vessel microwave reactions. This is because the temperature of a particular reaction mixture can only go so high at atmospheric pressure. Conventionally, SNAr reactions (Scheme 142, Chart 3) can require reflux conditions overnight, and sometimes, even 24 hours is needed. When I first attempted the reaction shown in the scheme, I chose to run it for 30 minutes. Equipping my instrument with a 1.5 foot reflux condenser, the following additional parameters were set: 250 W of power; 175 °C. Using acetonitrile (bp 82 °C) as my solvent, I set a high temperature to ensure a constant power level of 250 W. The temperature reached 95 °C after one minute and remained there for the duration of the reaction. Upon completion and analysis with GC/MS, I obtained my product in quantitative yield.

Chart 3

Scheme 142
Let’s assume that this reaction had not worked and the starting materials were the only compounds recovered, or very little product was obtained. The first change I would make is to increase the reaction time. If there is no product present after the initial run period, I would double the reaction time. In this case, run the reaction for an additional 30 minutes, and reanalyze the resulting mixture. In situations where the product is beginning to show, but in very small amounts, I would increase the reaction time in 10-minute increments.
If increasing the reaction time is not solving the problem, then temperature can be optimized. However, the only way to do this is by changing the solvent. If you want to increase the bulk temperature of your reaction, you must choose a solvent with a higher boiling point. If this is the case, I refer you back to the second part of the method development section in this chapter. There are many different solvents to choose from and the reaction chemistry you are performing will dictate this choice. You may also opt to use simultaneous cooling, if your microwave instrumentation is equipped with this feature. It will allow you to apply up to 300 W of microwave energy to your reaction system, but the bulk temperature will remain low. In the case of the SNAr reaction, I would have been able to apply 300 W to my reaction, but the overall temperature would have been much lower than 95 °C. Once again, remember to change only one variable at a time, so when something is successful, you will know which parameter it was.
Though this chapter was written with the intent of providing the reader with basic knowledge on getting started using microwave instrumentation and some guidelines in designing and optimizing program methods, the best way to learn microwave synthesis is to actually do it. You cannot hurt the instrument, so be aggressive and innovative. Vessel failures are going to happen occasionally — it is OK! Just as you would do if a reaction flask exploded in your hood, pick up the pieces and move on. There is a completely new side of organic synthesis that is waiting to be discovered.
Instruments

18. a) Internal Communication, CEM Corporation, Matthews, NC. b) This reaction was performed on a CEM Discover System. This microwave system is equipped with “hot keys”, which allow the user to change parameter values “on-the-fly”. One of these hot keys is for simultaneous controlled cooling. Once the reaction has reached its programmed temperature, the cooling option can be turned on with the hot key. This will ensure a constant, high power level. Use of the power hot key can then allow the user to increase the power level in small increments in order to maximize the amount of microwave energy being delivered to the reaction.